Nummer: 98-03 Datum: 24 september 1998
Vervangt: N.V.T.
Betreft: Release Housings alle Vector systemen, vanaf 0 1 -0 1 - 1996. Alle Harness/container systemen, welke voorzien zijn van Relative Workshop or ParaStock Metal-Flex breakaway housings, met Amp Fittings, gemonteerd na 1 januari 1996.
Probleem :Verkeerde montage van de AMP Fittings (het kabeloog). Door verkeerde montage van de AMP Fittings kan het voorkomen, dat deze losgaan, waardoor een ongewilde break-away mogelijk is.
Oplossing : Controleer de bevestiging van de AMP Fittings, zoals aangegeven in het bijgevoegde PSB#091098-A. Indien deze niet op de juiste manier bevestigd zijn, dienen deze op de wijze, zoals aangegeven in het PSB opnieuw bevestigt te worden.
Uitvoering :Voor de eerst volgende sprong. Met betrekking tot het opnieuw bevestigen, door een erkend valschermtechnicus.
Noot : Er dient een aantekening gemaakt te worden op de logkaart, indien de modificatie is uitgevoerd.
Verzending AB/TC/EC/B.P.R.A.
Valschermtechnici
Leden V.v.V.
Instructeurs
i.a.a. redactie SP
Bijlage: kopie van PSB#091098-A
<typohead type=2 align=center>PRODUCT SERVICE BULLETIN </typohead>
September 10, 1998
PSB#091098-A
<typohead type=3 align=center>AMP Fitting (with grommet) on Breakaway Housings </typohead>
Status: "Amp Fittings" improperly swaged to the end of the stainless steel breakaway housings. The Amp fitting could twist off or fall off.
Identification: All Relative Workshop Vector Systems manufactured after January 1, 1996. Any Harness/container system which utilizes Relative Workshop or ParaStock Metal-Flex breakaway housings which were shipped with Amp Fittings attached after January 1, 1996.
Background: In mid 1997, a worker at Relative Workshop decided to "improve" the way he was swaging the Amp Fittings on the end of the breakaway housings. Instead of correctly using a complete single or double stroke with the NICOPRESS swaging tool, he thought a series of partial strokes, applied in a rotary fashion, looked better. This "improvement" made it through quality control because his handiwork was covered by the standard black shrink tubing, and 99% of the Amp Fittings swaged on by this method pass a straight pull test of 50 lbs. HOWEVER, a large number can be twisted off with finger pressure applied in a certain direction. Because an Amp Fitting coming off in use could cause an unintentional breakaway, fittings attached in this fashion must be identified and re-swaged. While the fix is rather simple and straightforward, The Relative Workshop is sorry for any inconvenience it will cause owners of Vector Systems. Please note we are also including systems produced in 1996 to be sure we locate all affected components.
Tools Required:
1) Dial or digital caliper in inches or millimeters.
2) NICOPRESS TOOL - 64-CGMP; or
3) SWAGE-IT TOOL - P-26-0204
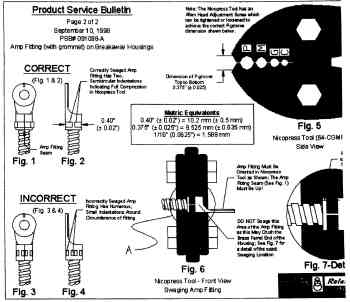
Service Bulletin: Inspect the "Amp Fitting" in the following manner: 1) Remove the heat-shrink tubing surrounding the Amp Fitting and housing. 2) Refer to the diagram on Page 2, figures 1 & 2. Determine if your Amp Fitting's swaged indentation resembles these correct diagrams. If so, double check by measuring the indentation diameter per figure 2. The correct dimension is 0.40 inches, +/-0.02 inches. (Refer to Page 2 for metric equivalents) 3) If your Amp Fitting resembles the incorrect version, as in Figure 3 & 4, then the Amp Fitting will have to be swaged again using the following procedure.
Note: If the Amp Fitting is completely removed from the housing, it cannot be properly mated with the housing again. A new Amp Fitting and housing must be used.
Note: As you gain experience inspecting Amp Fittings, you will be able to differentiate a correct swage versus one that is incorrect by looking at the shape and depth of the indentation without removing the shrink tubing.
Swaging Procedure:
1) Using the NICOPRESS TOOL (64-CGMP), place the Amp Fitting into the P-groove; or using the SWAGE-IT TOOL, place Amp Fitting into the 118 groove.
2) Be sure only 1/16" of the fitting's round end extends beyond the P-groove or 118 groove. The fitting must be oriented in the NICOPRESS TOOL as shown in Figure 6 to prevent the Amp Fitting's seam from breaking open.
3) Compress the fitting by closing the NICOPRESS TOOL or SWAGE-IT TOOL completely. One strike is all that is necessary. The housing's ferrule-end should not be incorporated into the swage indentation, otherwise the housing and ferrule may be crushed.
4) Referring to Figure 2, measure the swaged indentation with a set of calipers. The correct dimension is 0.40 inches, +/-0.02 inches.
5) Install the breakaway handle. Be sure the yellow cable's movement is not impeded by the end of the housing with the Amp Fitting.
6) Install new shrink tubing, 1/2 diameter - 1 " long. Heat the shrink tubing with a heat gun or cigarette lighter. Shrink tubing available free from Relative Workshop.
Qualified Personnel: A certificated rigger may inspect and re-swage Amp Fittings using the proper NICOPRESS TOOL or SWAGE-IT TOOL. Document work performed with the data card entry: "Conforms to PSB#091098"
Compliance Date: Immediately, before the next jump.
Authority: Relative Workshop, DeLand, Florida, USA
Distribution: Parachutist, PIA, Skydiving, USPA, FAA, Relative Workshop Web-Page.


